Entity Manager
The Entity Manager screen is where all entity information is created, viewed, and edited. Bill Entities (Billing Parties), Clients, Major Clients, Timekeepers (Lawyers, Secretaries, etc), and Vendors are all classed as Entities.
When the Entity Manager routine is accessed from the eQuinox main menu, the screen shown below will be displayed.
Usage
The Entity Manager screen has many uses. It is the central location for information about all Companies and/or People associated with the Firm. The top block of the form is used solely for query filters (to search for a particular Entity or group of Entities). Query results are displayed in the bottom block of the form. For example, to search for all Clients, the user can hit F7 (Enter Query Mode), 'check' the Client category, and then hit F8 (Execute Query). The names of all Clients will be returned and displayed in the bottom block of the form. To then view or edit specific details about one of the Clients that is displayed, the user may select the Client name and then hit the Client button at the bottom of the form, which will take the user to the Client screen.
For users with Administrator and/or Accounting privileges, this screen also has another use; it allows users to consolidate multiple entities into one. This feature takes all affiliations, WIP, and financials associated with the entity (or entities) begin consolidated (essentially, those being deleted) and brings the information into the field for the entity they are being consolidated into (the one entity being kept).
The user can also select multiple fields by which to search. For example, to query information on all Vendors with the last name "Jones" and with a '506' area code, the user would 'check' the Vendor category, enter 'Jones' in the last name field, enter '506' in the area code field, and then hit F8 (Execute Query). All relevant information will be returned and displayed in the bottom block of the form.
Field Definition

Figure 1 - Entity Selection Parameters
Entity Selection Parameters
This section of the screen allows the user to restrict their query results. For example, to search for any entity with the last name "Brown", the user can press [F7], then enter %brown% in the Last Name field, and then press [F8]. The results for this query will be displayed in the middle section of the screen.
If the user wanted to further restrict the query results to include only those entities with the last name "Brown" AND residing in the province of Ontario, the user would press [F7], enter %brown% in the last name field, enter "Ontario" (or "On%") in the Province field, and then press [F8] to execute the query.
If the user wanted to restrict the query results even further, to include only those entities with the last name "Brown" AND residing in Ontario, and who were Clients in the system, the user would press [F7], enter %brown% in the last name field, enter "Ontario" (or "On%") in the Province field, check the "Client" box, and then press [F8] to execute the query.
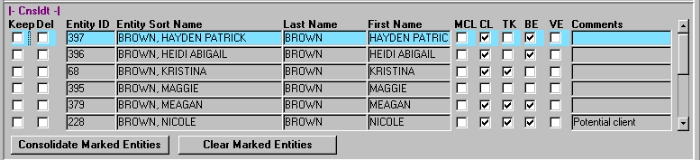
Figure 2 - Query Results
The section of screen seen in Figure 2 serves various purposes: it displays query results, allows those with the appropriate privileges to consolidate entities, allows users to create new entities, and allows users to give existing entities new classifications.
Reviewing Query Results
When reviewing query results in this section, the information is for display purposes only. Details include the entity's Entity ID (A unique system assigned number, used to track this entity throughout the system), name, classification (i.e. Major Client, Client, Timekeeper, Bill Entity, Vendor) and any comments entered about this entity at the entity level. To review details about the entity in their different roles/classifications, select the entity record in this section, and then click on the appropriate button at the bottom of the screen. For example, to review the details of entity Kristina Brown as she is set up as a Client, set focus to the Kristina Brown record, and then click the Client button at the bottom of the screen.
Consolidating Entities
When consolidating entities, the user must select a single entity to "keep", and then at least one to "delete". To do so, the user can simply "check" the Keep and Del check boxes for the appropriate entities. Once the selections have been made, the user must then click the Consolidate Marked Entities button. Or, to clear the selections without finishing the consolidation, the user may simply click the Clear Marked Entities button. During an entity consolidation, all information (affiliations, WIP, financials, etc) from the entity being deleted is brought over the file for the entity being kept. Should a problem arise with affiliation duplication, the user can simply delete the unwanted affiliation. For more details on consolidating entities, please refer to the "How Do I..." section of this help system.
Creating New Entities
To create a new entity, the user can simply click in an empty line in this section of the screen, and then click on the Entity Detail button found at the bottom of the screen. The Maintain Entity Detail screen will be launched, where the user can then enter and save the information for the entity being created. For more details on creating new entities, refer to the "How Do I..." section of this help system.
Assigning Classifications
Once an entity exists in the system, it can then be assigned a classification (i.e. Client, Timekeeper, Vendor, etc). To assign an entity a classification, the user must query up that entity, and then select the entity record in the query results section of the screen. The user must then click on the appropriate button at the bottom of the screen. For example, to assign Maggie Brown the classification of Client, the user must click on the entity record that reads Maggie Brown, and then click on the Client button at the bottom of the screen. The Client screen would then be launched. For details on creating Bill Entities, Major Clients, Clients, Timekeepers, and Vendors, please refer to the corresponding help screen.

Figure 3 - Entity Address and Contact Details
The next section of the screen, as seen in Figure 3, is also part of the query results. This section is made up of two tabs: Address and Telephone & Email. These tabs display details specific to the current record in the previous section of the screen (Figure 2). This information is as entered at the entity level and is for display purposes only. To edit this information, the user must select the entity record in the previous section of the screen and then click the Entity Detail button found at the bottom of the screen.
![]()
Figure 4 - Entity Type Buttons
Located at the bottom of the Entity Manager screen is the row of buttons shown above. These buttons allow the user to access other forms (i.e. the Entity Detail button takes the user to the Maintain Entities form). Also, the user can select an Entity on the form and assign it to a specific entity type using these buttons. For example, the user can select ABC Company from the list, and click the Client button. If ABC Company is not currently a Client with the Firm, the user will be asked if they wish to create the ABC Company as a Client. If the user responds "Yes", they are taken to the Maintain Client Information form, where any additional needed information can be entered. If ABC Company already exists as a Client, the user can still access the Maintain Client Information form and view, enter, or edit Client information about ABC Company.
Once the user has finished entering or updating information, they must click the Save button or press [F10] to commit the changes to the database.